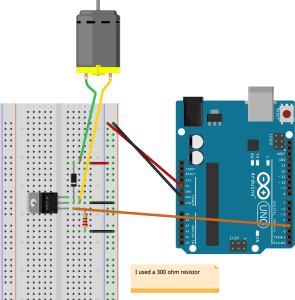
I’m teaching a Critical Making course and a question came up regarding how to run a DC motor from the Arduino. It was a bit tricky to get figure out how to do this using the parts in the Economic Starter Kit that students were told to purchase from Creatron, our local purveyor of maker stuff. There were a couple of puzzles, how to use the parts we were given and which online tutorial to follow.
I played around a bit and here is my result. I used the tutorial from bildr, which I found via the page for my MOSFET transistor on Sparkfun.
Parts
Arduino Uno (Rev 3)
Breadboard
DC Motor
Switching Diode (1N4148, 75V, 100mA)
N-channel Transistor (FQP30N06L)
330Ω Resistor
Graphic
If I’ve muffed up the diagram, let me know.
Code
I used the code from the Adafruit tutorial on DC Motors.
Things to notice or could go wrong.
1. Make sure the diode is going the right direction. If you’re not sure, try it both ways.
2. Make sure you are using a PWM (Pulse-Width Modulation) pin on the Arduino. In the code, it’s Pin 3 and that’s correct for an Arduino Uno
3. Make sure that bare wires are not touching.


It’s unclear from the Fritzing what is connected to the right leg (top leg) of the transistor..the yellow wire? Otherwise it looks to be just hanging there.
Oh, thanks for pointing this out. It’s power and the yellow wire that go to the right/top leg of the transistor. The motor goes to the centre leg.